OneClick
- Jed Danner
- Daniel Ghirelli
- Jack Fisher (Unlicensed)
OneClick Overview
Feature Explained
gotoBilling’s OneClick feature is a one-page web payment form for online payments that can be easily added to any website with a little configuration and programming. It will accept both Credit Card and ACH(eCheck) payments, and also supports accepting Credit Card payments through both Google Pay and Apple Pay (Apple Pay is available only on compatible devices). The payment form itself is on the gotoBilling servers so there is no development needed of the actual payment form.
When implementing the OneClick, the complete amount of the sale must be sent to the payment form as it is the one field that cannot be edited by the consumer when they are on the payment page. If the website sending the customer to the payment form has already captured the customer’s name, address, phone, email, and other contact information, that information can be sent to the OneClick form so the customer doesn’t have to re-type the information.
OneClick supports both single (one time only) payments, as well recurring payments - within recurring payments there are options to to default the schedule that the payments will be made on, as well as default a maximum number of payments to collect. Additionally, there are options to include so that the paying customer can decide if they would like their payment to become a recurring payment, and will allow that customer to select the payment schedule and maximum number of payments to collect with the recurring schedule.
The OneClick form will display the logo of the merchant so it appears to be part of the merchant’s branding. That logo is served up from the logo that is on file at gotoBilling based on the Merchant ID (MID). There are two ways to implement the OneClick. One is with the original programming to encrypt the data, the other is pure HTML so no programming in PHP or other languages is required. Additional features including enhanced security controls, gateway response configurations and expanded customer and transaction fields can be found in the greater AIM API documentation located at: Advanced Integration Method (AIM) Implementation Guide
Example OneClick
The following link will take you to an example of the OneClick we have setup on the gotoBilling system. It is not attached to any real merchant account so no card numbers or information is stored or processed, but you can see how it works for taking all available payment types including Credit Cards, ACH(eCheck) payments, Google Pay and Apple Pay (on compatible devices) as well as see the preferred method for it being a small popup window.
https://secure.gotobilling.com/examples/one_click_example/index.php
Section 1: OneClick Screen Shots
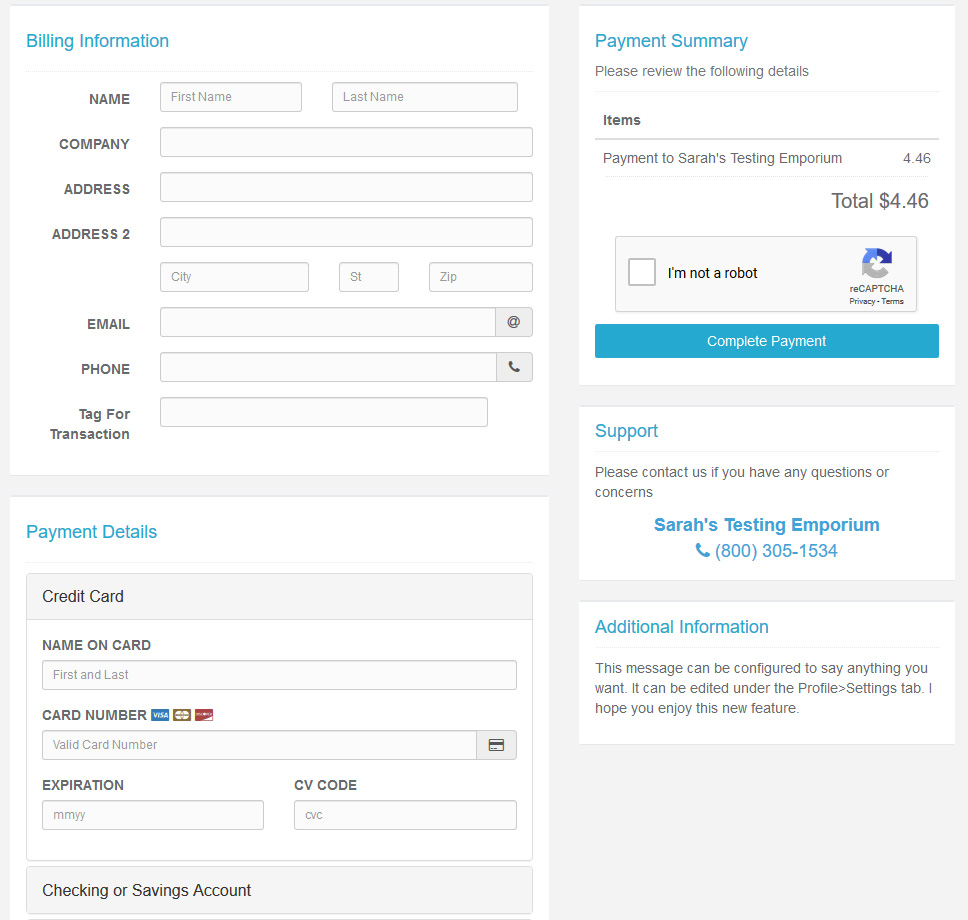
When the OneClick payment page is launched by a website, the following is an example of what the customer would see if all that was sent was the total amount of the order. The logo at the top left is served up from the gotoBilling system based on the merchant so the merchant’s customer always sees the merchant’s logo:

As you can see, the “order amount” is not editable. The customer would enter all of their contact information and then choose the payment method; Credit Card or Checking Account. Upon choosing their payment method the screen will open up with the correct fields and instructions based on the payment type selected. The form will only give the customer the option of Credit Card (includes Google Pay and Apple Pay) or Checking Account based on what the merchant is setup to handle. Therefore, if the merchant only accepts one payment form, the option for the other type is not available for the customer to choose.
Recurring Payment Options
Recurring payments can be allowed by the merchant on a per transaction basis by including the parameter: x_allow_recurring=true in the options passed to transact.php - including this parameter with no additional recurring parameters will result in allowing the paying customer to select the schedule that the payments will occur on, as well as a maximum number of payments to collect. Passing additional recurring parameters of x_occurrence_type and x_occurrence_number will default the recurring payment options to a particular schedule and/or a maximum number of payments and the paying customer will not be able to change these values.


Choosing Credit Card Payment Option
The bottom portion of the screen opens up when the customer chooses Credit Card as the payment type:
The customer can pay by any of the 4 credit card types (Visa, MasterCard, American Express, Discover). The types of credit cards accepted by the merchant are configurable within their profile settings.
Choosing Checking Account (ACH-eCheck) Payment Option
The screen opens to a different section when the customer chooses Checking Account as their payment type.
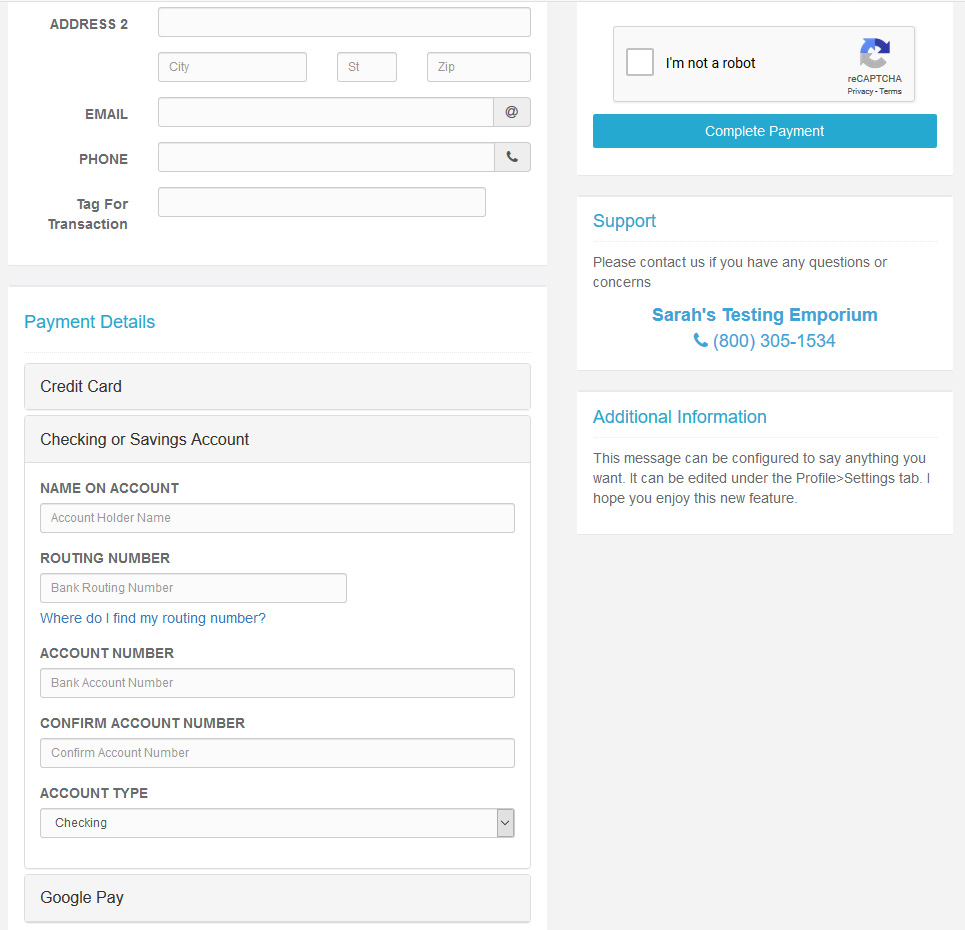
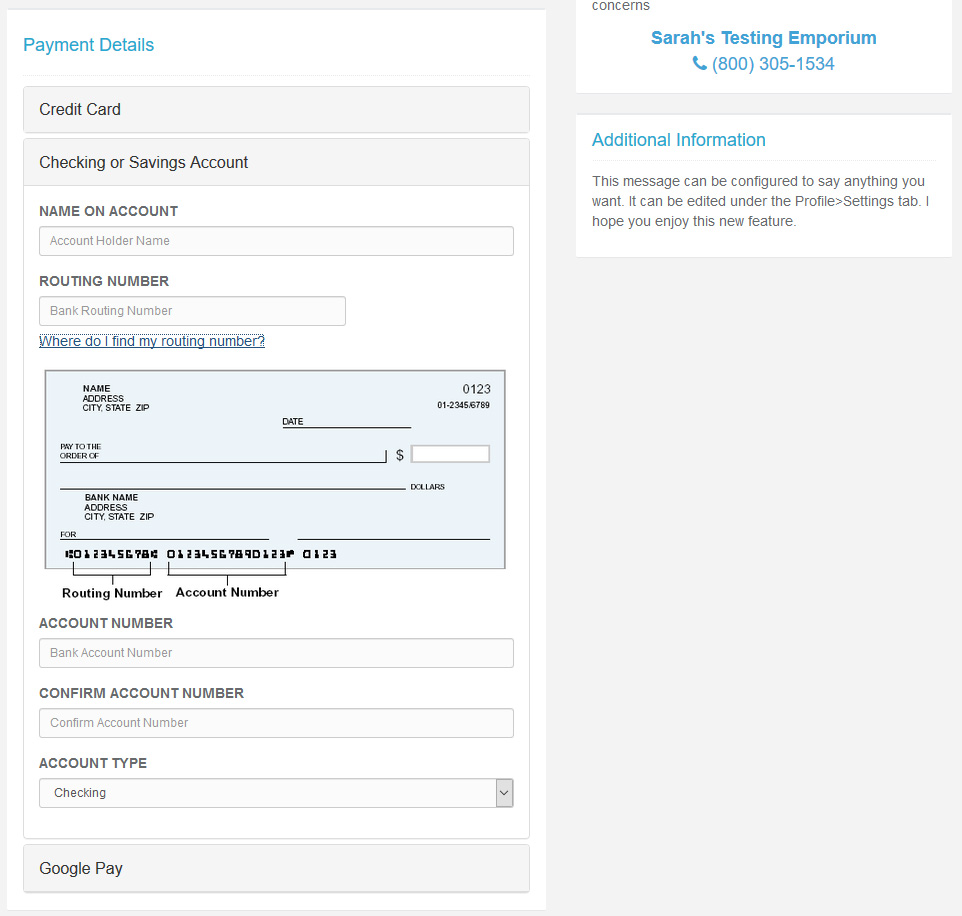
If you click on the text "Where do I find my routing number?" an example check is shown to make it as easy as possible for someone that has not done this before to get the correct numbers entered from their checking account.
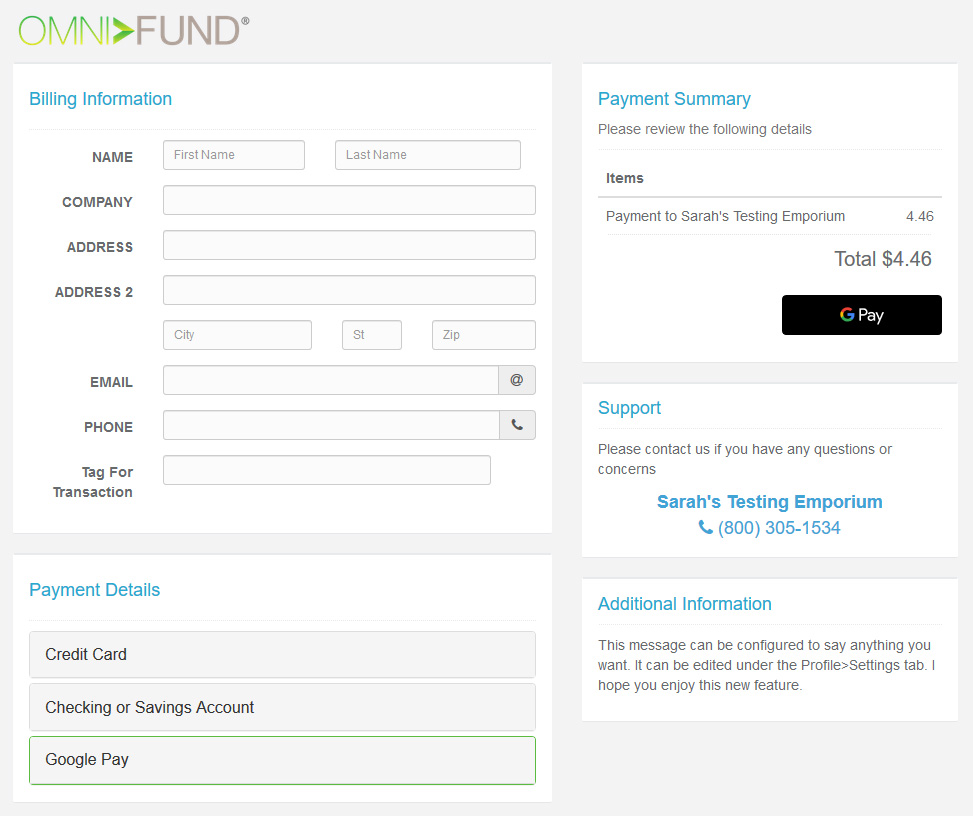
Choosing Google Pay Payment Option
Selecting the "Google Pay" payment option will display a Google customized "GPay" payment button in the "Payment Summary" section that will launch the Google Pay payment window.
Choosing Apple Pay Payment Option
The Apple Pay payment option will only be displayed on compatible devices. The payment option is hidden to non-compatible devices. Selecting the "Apple Pay" payment option will display an Apple customized "Apple Pay" payment button in the "Payment Summary" section that will launch the Apple Pay payment interface.

Section 2: Installation Instructions
As mentioned earlier in this document, there are two ways to implement the OneClick. One way is to use pure HTML without the need to encrypt some of the information. The instructions in this section allow you to create an HTML page that will call the OneClick without the need to program in PHP or other languages.
Example HTML Page
The following HTML example shows how to properly launch the OneClick payment form with the amount of $33.00 as the total order amount.
<HTML>
<HEAD>
<TITLE>Example OneClick HTML page</TITLE>
</HEAD>
<BODY>
<H3>Final Order</H3><BR />
<H2>Order Total $33.00</H2><BR /><BR />

<form action="/gateway/transact.php" method="POST">

<input type="hidden" name="x_login" value="234568">
<input type="hidden" name="x_amount" value="33.00">
<input type="hidden" name="x_description" value="My Order">
<input type="hidden" name="x_show_form" value="PAYMENT_FORM">

<!-- Receipt page the response will be redirect to
<INPUT type="hidden" name="x_relay_url" value="http://www.mydomain.com/thankyou.html">
-->


<INPUT type="hidden" name="x_invoice_num" value="">
<INPUT type="submit" value="Accept Order">
</FORM>
</BODY>
</HTML>
The x_login is also known as the gotoBilling Merchant ID (MID). It is normally a 6-digit number. This field is critical as the wrong value will send transactions to the wrong gotoBilling Account. In this example, the MID being used is 234568 which is our standard developer’s test account.
You can hard code the x_amount field if you have a set price or you can pass the amount from a shopping cart to this field. This field is required as the payment form does not allow the consumer to change the amount.
The x_relay_url allows you to redirect any responses from gotoBilling to to a specified page for you to capture the response information.
Upon clicking the OnceClick button on your website, your customer will be taken to the pop-up window containing the OneClick form as described in Section 1 of this document where they can complete their transaction.
Additional Security Parameters
For increased security you may also pass two additional fields with your OneClick request.
| x_fp_hash | Similar to the MD5 hashing feature returned by the gateway response, the x_fp_hash is build by creating a MD5 hash with the following fields:
Generating x_fp_hash with PHP hash_hmac('md5', $merchantId.'^'.$fpSequence.'^'.$timestamp.'^'.$amount.'^USD', $hashKey);
|
| x_fp_timestamp | This is the timestamp (unix) of the request. Must be in UTC timezone. This will be the same timestamp value that was included in the x_fp_hash. |
| x_fp_sequence | Custom sequence value designated by the merchant. Also used in the creation and validation of the x_fp_hash. |
| x_fp_expiry | (optional) Custom expiration time defined by the merchant, in minutes. If x_fp_expiry is given, the value must also be included in the string portion of the x_fp_hash generation. Generating x_fp_hash with expiry hash_hmac('md5', $merchantId.'^'.$fpSequence.'^'.$timestamp.'^'.$amount.'^USD^'.$fpExpiry, $hashKey);
|
Passing Customer Contact Information
In addition to the required fields included in the example code above, you can also pass the customer’s contact information. If you pass all these fields, your customer will not need to re-type the information on the OneClick payment form. The names of these fields are:
| Company | x_company |
| First Name | x_first_name |
| Last Name | x_last_name |
| Address | x_address |
| City | x_city |
| State | x_state |
| Zip | x_zip |
| Phone | x_phone |
| x_email |
Passing Hidden Data Such as Invoice Number, Notes, and Customer ID
There are other fields that are not visible on the actual payment form which you can pass along with the transaction and have it recorded in the gotoBilling system. For a full list of fields that are available, please reference the following document:
Advanced Integration Method (AIM) Implementation Guide
One of the most common is for the inclusion of a customer number and/or invoice number for websites that are developing a bill payment feature. The customers go to the merchant’s website and there’s a field for entering either their customer number of more importantly, the invoice number or maybe both. That data can be sent to the OneClick form in a notes field. The Notes field is automatically added to the customer’s email confirmation about the transaction. The Notes field is a free form text field that any data can be stored and it’s stored permanently with the transaction in the gotoBilling system. When you are logged into your account in gotoBilling, the data passed into the Notes field appear in both the Notes and Memo fields. The name of this field is: x_description
Customer ID You can also push a unique customer ID using the field x_cust_id. Each customer (also known as an “Account ID” in gotoBilling) has a unique ID. If no Customer ID is supplied, the gotoBilling system automatically generates a unique one. If you want to submit your own unique Customer ID when sending transactions into gotoBilling, then use the x_cust_id and all data will be tied to that single Customer/Account record in gotoBilling. This is great when the webpage or shopping cart that is launching the OneClick has a unique customer number for the consumer.
IMPORTANT NOTE: Since the x_cust_id is a unique value and can be anything (letters and numbers, etc.), letting your customer simply fill out the field is not recommended. Since there is no verification on the correctness of that Customer ID, the ability for someone to incorrectly enter a Customer ID that might belong to someone else can cause problems. Doing so would overwrite the customer data on file for that unique ID and replace it with the new customer information being sent. Therefore, tight control of the customer ID must be in place for it to be useful. However, having said this, you could allow a customer to enter their customer ID in a field along with other information you might want to capture and simply concatenate all those fields and send that information through in the x_description field for good recording keeping and reconciliation purposes.
If there are any questions regarding this API, please contact our support desk at Support Desk or send an email to support@omnifund.com.
Code Examples
Simple Form Submission Example
- Replace the form field x_login value with your valid Merchant ID.
<HTML>
<HEAD>
<TITLE>Example OneClick HTML page</TITLE>
</HEAD>
<BODY>
<form action="/gateway/transact.php" method="POST">
<input type="hidden" name="x_show_form" value="PAYMENT_FORM">

<!-- Replace this value with your valid Merchant ID -->
<input type="hidden" name="x_login" value="234568">

<!-- Enter pre-set amount, or leave blank to allow customer to enter an amount -->
<input type="hidden" name="x_amount" value="1.00">

<!-- Enter a description for the payment -->
<input type="hidden" name="x_description" value="My Order">

<!-- Receipt page the response will be redirected to, un-comment to use -->
<!-- <input type="hidden" name="x_relay_url" value="http://www.mydomain.com/thankyou.html"> -->

<input type="submit" value="Accept Order">
</form>
</BODY>
</HTML>
Text Link with Pop Up using jQuery Example
- Requires jQuery library.
- Replace the form field x_login value with your valid Merchant ID.
<html>
<head>

<script>
$(document).ready(function() {

    clickHandler = function(event){
      // Cancel the default action (navigation) of the click
      event.preventDefault();

      // submit the form
      form.trigger('submit');
    },

    submitHandler = function(event){
      // open window in a pop-up
      window.open('', 'payment', 'width=650,height=685,status=yes,resizable=no,scrollbars=yes');
    }

    form = $('#make-payment-form');

    // listen for a click on the payment link
    $('#make-payment').bind('click', clickHandler);

    // binds the submit handler to the form submission
    form.bind('submit', submitHandler);


});
</script>

</head>

<a id="make-payment" href="#"><span>Make a Payment</span></a>

<form id="make-payment-form" action="/gateway/transact.php" method="POST" target="payment">
<input type="hidden" name="x_login" value="123456" />
<input type="hidden" name="x_description" value="Make a Payment" />
<input type="hidden" name="x_show_form" value="PAYMENT_FORM" />
</form>

</body>
</html>
Text Link without form element
Any of the One-click gateway fields can be included with the request. There two provided here as an example. The value of 'x_login' should be replaced with your valid Merchant ID number.
'x_amount' is optional. if not provided the user will be provided a input field to enter the amount of their payment. 'x_description' is optional.
<a href="/gateway/transact.php?x_login=123456&x_show_form=PAYMENT_FORM&x_amount=1.00&x_description=New Payment">Make A Payment</a>